
Troubleshooting Workflows

After runtime, the process diagram will highlight each element with colours, to visually communicate the outcome of a process run and assist with troubleshooting.

A diagram depicting how a completed process run will appear. In this example, a start event flows into an exclusive gate, and then diverges down two separate paths as outputs. The upper flow path is labelled if quantity > 100 and the lower path is labelled if quantity <= 100. The start event contains a label that reads "Workflow is triggered with quantity = ?. Both paths lead into a single default task. The upper flow task reads "Large-batch manufacturing" and the lower flow task reads "Small-batch manufacturing". Both paths then flow into a single end event. The following elements are highlighted green: start event, gateway, lower path, lower path task, and the end event. From this, it can be determined that the lower path of quantity <= 100 was taken, as this is the section that is highlighted green.

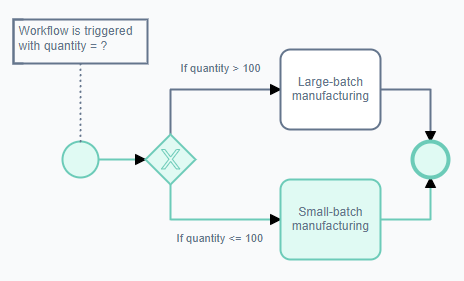
Above: This process run took the lower sequence flow route, as indicated by the green elements.

ColourMeaning
WhiteThe element did not execute.
GreenThe element was executed and completed without error.
YellowThe element has been executed, but has not completed yet. (e.g. awaiting a user's input)
RedThe element was executed, but encountered an error.

Accessing Previous Process Runs

Previous Process Runs Accessed via Workflow Experience

Previous process runs can be accessed using the drop-down menu in the Command Strip.

  1. Ensure you are viewing the desired process run
  2. Press the Process Run drop-down menu.

A screenshot that demonstrates the appearance and location of previous process runs when inside the Workflow experience. The Command Strip at the top of the Workflow page contains a dropdown menu. The screenshot is annotated with two red boxes to indicate the main button, and the options that appear. In this example, the button reads: "Process Run: 18 (Manufacture Erasers)". The other items have the same label, but with a different ID number (i.e. 17, 16, 15, etc.). Each process run has an icon of two nodes connected by a sequence flow.

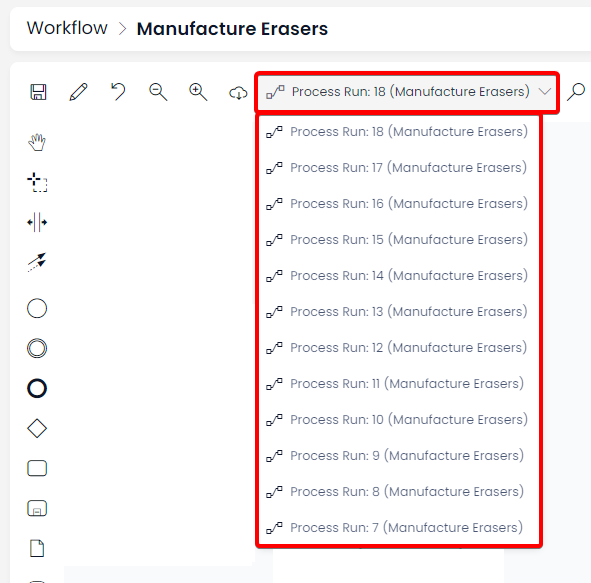
This drop-down menu does not allow you to access previous builds or diagrams (i.e. if you want to return to how the diagram was built before you saved it). Instead, this is used to determine the outcomes of previous process runs, and to assist with troubleshooting.

All process runs (whether triggered manually, automatically by Rapid System, or via a menu item) will appear here in this list. Each process run is assigned an ID to assist with troubleshooting.

Previous Process Runs Have Static URLs

You can also navigate directly to a process run by typing the run number into a properly-structured URL.

A screenshot that demonstrates how a process diagram's URL is structured. The URL reads: "https://environment.tenant/site/workflow/diagrams/4/edit?run=20". In red text, the number 4 is highlighted and labelled as being the Diagram ID. The number 20 is also highlighted, and labelled as being the Process Run ID.

Previous Process Runs Are Linked to Items

Example

A user informs you that a process run did not operate correctly when it was triggered from an item's menu button.

  1. Open the specific item that triggered the process run

  2. Click the Linked Items Menu Button button in the Command Strip

A screenshot of the location and appearance of the "Linked Items" menu button. The menu button has an icon of two chain links, and a downwards chevron indicating that it will open a drop-down menu or panel. The screenshot is annotated with a red box to highlight the button's location.

  1. Find the desired process run (they are arranged from latest down to oldest).

  2. Press the Go to process run button

A screenshot of the panel that opens from the "Linked Items" menu button. The panel has a section at the top titled "Filter items linked to this Paper." Note that in this example the table is called "Paper". Underneath this is a dropdown section titled "Process Runs (1)" indicating that all the items listed underneath it are process runs, and that there is currently only one process run linked to this item. In the process runs section is an item titled "Manufacture Erasers" which is the name of the process run in this example. The screenshot is annotated with a red box to highlight the location of the process run item. The screenshot is also annotated with a red arrow and another red box inside the first red box, indicating the button to "go to process run". At the bottom of the panel is an "Add Link" button, but this is not relevant for this particular explanation.

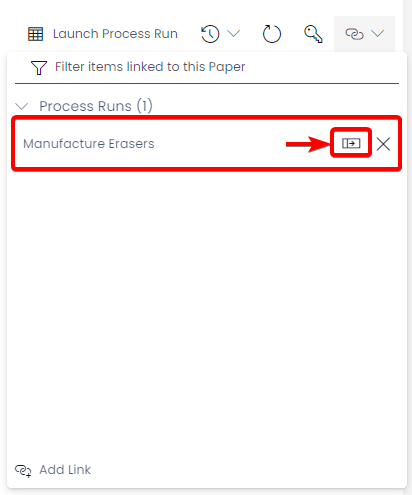
You will now be able to view the process run's results, and edit the process diagram if required by clicking the Edit Diagram button.

A screenshot of the "Edit Diagram Button". The button has an icon of a pencil and reads "Edit Diagram".

Error Messages

When an element produces an error, it will turn red in the process run's diagram.

A screenshot of a diagram showing how the elements return errors. In this example a green start event is on the left, indicating that the process began without error. The sequence flow is also green that moves into the exclusive gate on the right. The exclusive gate, however, is red, indicating that it has produced an error.

To read the relevant error message:

  1. Select the element with the error

  2. View the Properties Panel on the right side of the Workflow experience

  3. Click the Workflow Results tab at the top of the Properties Panel

A screenshot of the Properties Panel, and its tab "Workflow Results". In this screenshot, the workflow results contains a length error message underneath a red title that reads "Failed".

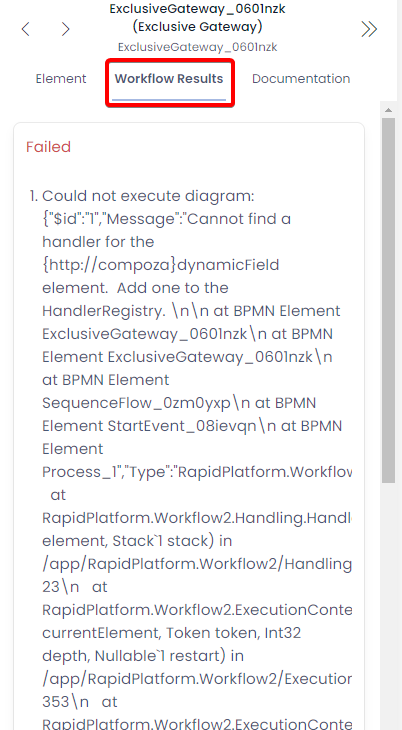
A summary of the element's status (e.g. "Failed") and an error message will be displayed.

Manually Restarting a Process Run

Process runs can be manually restarted they fail.

An example fail state

A Gateway element within a process is expecting to evaluate a string at runtime. Instead, a number is sent to the Gateway element. This will cause the element to error, and will halt the process run.

As discussed earlier, elements that error will be highlighted red for troubleshooting.

A screenshot of a diagram showing how the elements return errors. In this example a green start event is on the left, indicating that the process began without error. The sequence flow is also green that moves into the exclusive gate on the right. The exclusive gate, however, is red, indicating that it has produced an error.

To quickly restart the process run that has errored, Rapid provides a Restart button beside the launch button. After you have corrected a perceived error, this button will launch the process run again with the same trigger conditions for troubleshooting purposes.

A screenshot demonstrating the location and appearance of the "Restart" button in the Rapid Workflow experience. The button only appears when the process run has failed. The button has an icon of two arrows circling each other, and the label "Restart". The button appears to the right of the "Launch" button. The screenshot is annotated with a red box to highlight the location of the "Restart" button.

Manual Rollback

For more granular troubleshooting, a process run can be "rolled back" to a specific point in the flow diagram. This is useful for testing different branches of a diagram, or to skip earlier elements such as User Tasks.

To roll back a process run:

  1. Select the element where you would like to process run to return to

  2. In the Command Strip, select the Rollback to X button

A screenshot showing the appearance and location of the Rollback button. The Rollback button appears between the "Launch" and "Restart" buttons, when an element is selected after a process run has errored. The button has an icon of an arrow turning around from the right, back to the left. The label of the button in this example reads: "Rollback to ExclusiveGateway_0601nzk".

The Rollback Button

The label that appears on the Rollback button describes the specific element that has been selected. The label begins with the element type, then an underscore, followed by an alphanumeric string that is the item's unique element ID.

e.g. ElementType_elementID